Soap Making Instructions
Checkerboard Soap
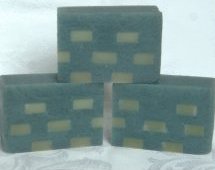
Give these simple soap making instructions to make a checker-board patterned soap at try!
Some of the links on this site are affiliate links. If you buy a product through them, I receive a small commission which helps me provide the free information you find on this site. Thank you for your support!
By embedding long sticks of soap into an alternate coloured base you can make various different patterns in your decorative soaps.
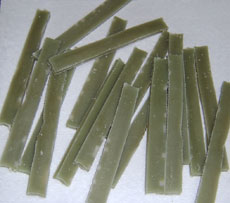
Start the process by cutting up some un-cured soap (the fresher the better) into strips that are long enough to reach the ends of your soap mould.
Use a long sharp knife or pastry cutter to make the strips. They don't need to be perfect.
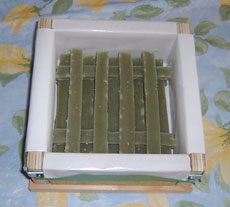
After you have cut all the strips, set the soaps into your soap mould. How you do this will depend on the size and shape of your mould.
In my 6" x 6" soap mould, I usually lay 4 down with space between them and on the next layer I only put 2 across the ones I've just placed.
This will add space for the liquid soap to flow between the layers. On top of the 2, I put 5 strips to cover the gaps of the layer below.
Repeat this pattern until the soap strips are gone or until you reach as high as you want to pour your soap in the soap mould.
See the example shown in the picture below. I end up with five layers and each the layer has the following number of soap strips: 4, 2, 5, 2, 4.
Once you're finished making the grid pattern, put the filled soap mould in a warmed oven with your other additives.
This will take any chill off the soap strips that could result in uneven saponification leaving chalky patches of soap or halo's around the soap sticks.
Do not leave the oven on with the soap and additives in the oven. You do not want to melt the soap, just warm it a little.
Make the soap base as usual and bring the batter to a thin trace. Mix in the additives and blend well.
Before you pour the soap base, remember that the soap mould will fill much higher than normal due to the soap bits already in the mould.
If you have not adjusted your recipe to account for this, you may want to have another mould on hand to put any extra base in if your mould fills too high.
Be sure to pour the lightly traced soap very carefully so as to not mess up the design. I like to keep a wooden skewer on hand to gently nudge any wayward soap sticks back into place.
Once the soap has been poured, give the mould a couple of gentle thumps on the table to get out any air bubbles.
Insulate your soap as you normally would and remember to cut your soaps so that you get the desired design from them.
Cut one way and you get the checkerboard but if you cut the other way, you get stripes. Either way the soap looks great!
Home › Decorative Soap Making Ideas › Checkerboard Soap Making Instructions


Facebook Comments