Rebatching Soap
What is rebatching soap? Rebatching or hand milling is the act of reprocessing a previously made batch of soap. This is accomplished by grating up the soap, adding other ingredients, melting it, and remoulding it.
Some of the links on this site are affiliate links. If you buy a product through them, I receive a small commission which helps me provide the free information you find on this site. Thank you for your support!
You might be asking why anyone would want to do this? Here are a few reasons.
I hadn't had much success in the past with rebatching soap. My last attempt was a stove top method that didn't work out so well for me. It was a dismal failure to say the least.
When I came across the crockpot method, I thought, "Hey, this might just work!" and I decided to gave it a try.
What I really wanted to know was if I could do it or not. If needed, could I repair a batch of soap?
Yes, I can and so can you!
I must admit that half way through the process, I thought I had failed.

It looked like an ugly mess and I was ready to call it quits but I followed through and put the mix into the mould anyway and let it cool.
The resulting cut soaps were surprisingly smooth and the color wasn't too bad either.
Next time I will try to pay more attention to the colours of soap I'm using and how they will blend together. Adding a little yellow or blue colourant would have brightened up the green nicely I think.
Crockpot Method of Rebatching Soap
I found this method to be much easier than the standard stove top method.
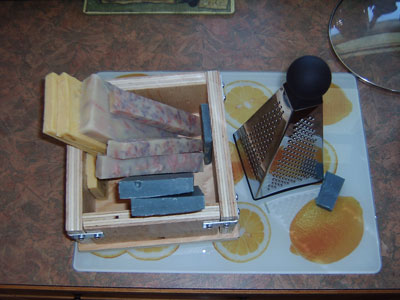
Grate up the soap to be rebatched and place into your crockpot.
I added about 3 tablespoons of water because some of my soaps were a little dry and to help prevent scorching.
Another option is to add a small amount of goats milk, whole milk or coconut milk instead of adding in water.
You can also add in extra oils but be aware that too much oil might cut down on your lather.
If you want to add any extra colourant, you can do so now as well.
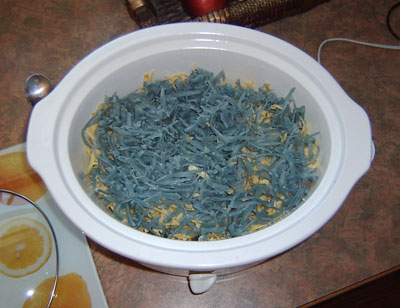
Turn on the crockpot to high (or lower if you think it will burn) and put the lid on the pot.
Keep an eye on the soap to make sure it is melting and isn't burning.
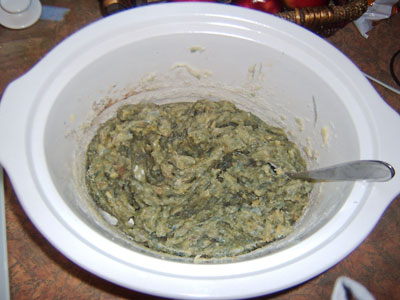
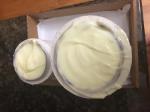
Notice how mine looks incredibly ugly? Don't panic like I did.
I found it to be like thick porridge and a little difficult to work with.
Once the grated soap bits are transparent, you can add in any other extra additives and your scent. You may need to let the soap cool slightly before adding in scent if the soap is hotter than the essential oils flash point.
When it is blended, spoon it into your mould. You'll want to work quickly so the mix doesn't cool too much before you get it all in the mould.
Once it has cooled completely, it can be cut and cured until the soap is hard enough to use.
Re-batching soap may not be my preferred method of soap making but it's nice to know that I can repair a batch of soap if necessary.
Boil in Bag Method of Rebatching
This next idea for re-batching soap was suggested to me by Lane, a talented soap maker who owns Luxury Lane Soap.
This method of re-batching soap is great because you don't have to worry about scorching and there is very little clean-up.
I would suggest using this method for hand milling small amounts of soap scraps. You can only fit so much into a ziplock bag.
Grate up your soap scraps and mix up to blend different colours. Be aware of the possible color combination results. ie. Pink and green will make brown. Yellow and blue will make green.
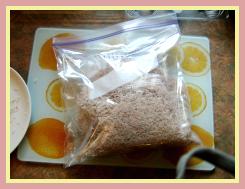
Place grated soap into a large freezer ziplock bag along with any extra oils, color, etc.
If the soap is really dry, you may want to add a small amount of water. One or two tablespoons should be enough.

Squeeze bag of air and seal. Place that bag into a second ziplock, squeeze and seal.
Once the bag is sealed, place it into a pot of simmering water and put on the lid.
Periodically check the bag to see if the soap is melting. Turn up the heat a little if nothing happens after 1/2 hour.
When the soap begins melting, remove the bag and smoosh or squeeze the mixture to blend it.
You may want to wear oven mitts or gloves to do this. It's HOT!
Return to pot until the mixture is completely melted.

When the soap has melted completely, quickly remove the bag from the pot and squeeze the soap to one corner.
Clip the corner of the bag at the bottom of the soap and pipe it into a lined soap mould to cool.
Remove and cut the re-batched bars when the soap is completely cool and has hardened.
That's it.....you're done! Pretty cool, don't you think?
Home › Rebatching Soap
Like This Page?
Site Sponsors

If you've found this site to be helpful in expanding your soap making knowledge and would like to make a SMALL donation to help with the cost of maintaining this site, your support would be greatly appreciated.
Recent Articles
-
Forgot to add the lye!
 Well, it was getting quite late last night and I was finishing up my last batch of soap. I got my water mixture out of the fridge and whisked it into
 -
Allergic to nuts/coconuts
I'm interested in making my own soap and shampoo bars, but my young son is allergic to all nuts and possibly to coconut. Is there a recipe I can use or
Facebook Comments