Hot Process Soap Making
Hot process soap making is another method of making soap that is quite popular due, in large part, to the fact that the resulting soap can be used right away.
Some of the links on this site are affiliate links. If you buy a product through them, I receive a small commission which helps me provide the free information you find on this site. Thank you for your support!
While this type of soap becomes harder much faster than soap produced using the cold process method, I still feel the bars benefit from a couple of weeks curing.
This gives the soap time to harden up further, lengthening the usage time of the bars and I find the soap is milder on my sensitive skin.
The hot and cold methods of making soap are very similar, each using the same base recipes and combining the ingredients in more or less the same way.
As the names imply, one method requires an external heat source to bring the soap to the gel phase before it is placed in a soap mould.
The other method use's it's own self generated heat to reach the gel phase after it has been placed into the soap mould.
I'm betting you've already figured out which is which!

There are a couple of things to consider before deciding to use this method of soap making.
1. More time is needed when using this method since you will have to watch over it while it is cooking. Be prepared to have a good couple of hours available. You will be able to do other things while the soap cooks but you will not be able to leave and you will need to check the soap frequently.
2. The look of the soap tends to be a little bit on the rustic side and does not have as smooth of a finish as the cold process method.
3. Some soap design ideas are just not possible with this method.
Hot Process Soap MakingTutorial
The method I am about to show you is the crock pot version of hot process soap making though you can also do essentially the same thing using your oven.
Ok, let's start...I'm going to assume that you have picked a recipe, obtained all the necessary ingredients and lined your soap mould.
Measure the Base Ingredients
When you're first learning how to make soap, it's best to limit yourself to just a couple of additives to begin with. As you become more familiar with making hot process soap, you will be more confident about adding in other techniques.
All the steps in these soap making instructions are important but with this step it is crucial that you pay particular attention to measuring accurately. Make sure you are familiar with your weight scale before you start.
Inaccurate measurements can produce lye or oil heavy hot process soaps which you will either have to re-work or throw out. Learning how to make soap is a lot more fun if you don't have to throw it out!! Make sure you get a good scale....it's the best investment you can make.
1. Measure additives and essential oils.
2. Prepare the lye solution.
- Measure out your water and place it in the juice jug.
- Before using sodium hydroxide, put on your safety equipment; goggles, gloves and long sleeve clothing.
- Measure out the lye and pour it slowly into the water stirring as you pour. Keep stirring until the lye crystals are completely dissolved.
- You will notice fumes being produced while you are mixing the lye solution. I hold my breath until the lye is dissolved and then leave the area for a few minutes until the fumes disburse.
SPECIAL NOTE: Always add the sodium hydroxide (lye) to the water. NOT the water to the sodium hydroxide. An unpleasant, violent reaction occurs if you do. Kind of like vinegar and baking soda is my understanding.
3. Measure base oils.
- Starting with the solid oils, measure each and place it into your crock pot that is set on low. As you continue to measure, the solid oils will melt.
- If you are going to use the oven method, simply melt the oils on the stove.

- Once the solid oils have melted, add the liquid oils.

Mix the Oils and Lye Solution
This is the step where hot process and cold process soap making start to differ. There's no need to cool the oils with hot process soap making...great for those who hate to wait!!!
1. Combine lye solution and oil mixture.
- Slowly pour a thin stream of the lye solution into the pot of oils while using the whisk/stick blender to stir the mixture.

- Maintain a steady, strong stirring motion. Not so fast as to splash but fast enough to keep the mixture in constant motion. The idea is to get the oil, lye and water molecules to meet and combine to make soap. If you're using a stick blender, pulse for a few seconds then stir for a few seconds. Repeat.

- Make sure to stir thoroughly all areas of the pot. The mixture will turn creamy and opaque and then will begin to thicken.

2. Stir mixture until it begins to trace.
- Keep stirring until the mixture reaches a thick trace.
- If you plan to make the soap one colour, you can add the colourant now. If you just want to make a swirl of colour or layers, add later.

Cook the Soap
Once the soap reaches a full trace, it's time to cook the mixture and force the gel.
(If you want to use the oven instead of the crock-pot, heat the oven to it's lowest setting. No higher than 170 degrees Fahrenheit / 76 degrees Celsius. Place the soap in an oven proof container that has lots of extra room and follow the same instructions as below.)
1. The Cook.
- Put the lid on the crock pot and leave it to cook on low for awhile.
- The soap will heat up and start to bubble around the edges of the crock pot.

- Keep an eye on the soap and stir it down gently only if it starts to bubble over.

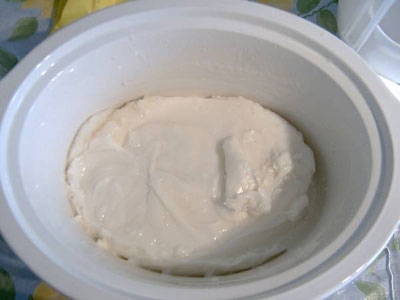
- The mix will begin to take on a clear Vaseline like look. Once the whole mix has this look, you can test it to see if it is done. Take a small sample of the soap and rub it between your fingers. It should have a waxy feel. Test the soap by touching it to your tongue, if it 'zaps' like a nine volt battery, it's not done. Keep cooking until it no longer 'zaps'.
Additives and Pouring Soap
Now is the time to add in any botanical bits and scent to your hot process soap mixture.
1. Incorporating additives.
- Mix in any botanical bits and extracts.
- If you want to make a swirl of colour or make coloured layers, divide off some soap and colour it now.
- Once the soap has cooled a bit, you can add the essential oils. Make sure to cool the soap to a temperature below the essential oils flash point. Flash point is the temperature that the essential oil will ignite and vaporize. If it is added at too high a temperature, your soap may not smell like you planned.
- You will have to work fast while mixing since the soap will cool quickly. Make sure that the additives are not cold. It is a good idea to heat them slightly if they are.
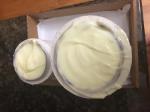
2. Moulding the soap.
- Hot process soap is a lot like re-batching when it comes to moulding. It doesn't pour. It is a thick gooey mass (like mashed potatoes) that must be scooped into the mould quickly.
- Make sure to gently tap the mould on the counter to get out any air pockets. Not too hard or some of the soap may pop out and burn you.
Cutting and Curing
Now you have to just leave it alone! It can take up to 48 hours to cool down and harden enough to remove from the mould.
1. Unmoulding.
2. Cutting.
- You can cut the soap into bars right away.
- I use a soap cutter that requires you to push the soap block through a thin wire. This tool makes cutting soap blocks a dream. The building plans for this cutter can be found in Catherine Failor's book "Transparent Soapmaking".
3. Curing.
- As discussed at the beginning of this page, once you have cut the soap into bars, they can either be used immediately or be cured for a few weeks. The longer the cure, the milder the soap.
- Place the soaps in a single layer on an empty beer flat or tray lined with paper towel and store in a dry, cool, dark location for maximum longevity.
4. You're Done!
- Now that you have learned how to make hot process soap, it's time to plan the next batch!!
Home › How to Make Soap › Hot Process Soap Making
Like This Page?
Site Sponsors

If you've found this site to be helpful in expanding your soap making knowledge and would like to make a SMALL donation to help with the cost of maintaining this site, your support would be greatly appreciated.
Recent Articles
-
Forgot to add the lye!
 Well, it was getting quite late last night and I was finishing up my last batch of soap. I got my water mixture out of the fridge and whisked it into
 -
Allergic to nuts/coconuts
I'm interested in making my own soap and shampoo bars, but my young son is allergic to all nuts and possibly to coconut. Is there a recipe I can use or
Facebook Comments