Melt and Pour Soap Tutorial
Melt and pour soap making is a great choice when you want to make soap but are short on time. It's quick, easy and there's no messing around with lye or oils.
Some of the links on this site are affiliate links. If you buy a product through them, I receive a small commission which helps me provide the free information you find on this site. Thank you for your support!
For the longest time I've been meaning to make a simple tutorial on how to use these fun soap bases but I kept procrastinating (something I'm really good at) until now.
With Valentine's Day right around the corner, I thought it would be nice to centre the theme of the soaps around this ever popular day and make little round soaps with simple, hand formed heart embeds.
This project is child friendly (with adult supervision) and provides something useful to give out instead of Valentine's cards or candy.
Valentine's Day Heart Soaps
The following lists are the supplies and tools I used to make the Valentine's Heart Soaps. Feel free to substitute with similar items you have on hand.
Supplies List
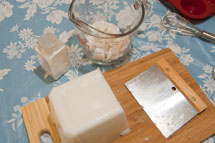
- Clear melt and pour soap base
- White melt and pour soap base
- Mica soap colourant (white and pink or red - mine is called ruby)
- Essential or fragrance oil (I used a blend of both)
Tools List
- Glass microwave safe measuring cup
- Whisk for adding in colour and scent
- Dough scraper for cutting soap block into chunks
- Pizza cutter to cut soap strips
- Parchment paper
- Cookie sheet or cake pan
- Round silicon molds (I used a silicon muffin pan)
Be sure to read the following instructions through before starting the process.


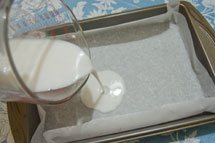
Begin by lining a cookie sheet or cake pan with parchment paper and set aside.
Cut 1/2 pound of white soap base into cubes and place in glass microwave safe measuring cup.
Melt the soap in short 30 second intervals. Be sure to gently stir (or swirl cup) between each 30 seconds and do not overheat the soap.
As soon as the soap has melted, add in 1/4 teaspoon of white mica and gently stir until incorporated. Try not to create bubbles.


Slowly pour the soap base into the prepared pan. Allow the soap to spread out naturally. It should be about 1/8 inch thick. Spray with rubbing alcohol to burst any bubbles.
As soon as the white soap is firm to the touch, cut it into strips. Do not allow the soap to become too hard. It should still be a little warm. If the soap cools too much, it will no longer be pliable and you will not be able to make the hearts.
Make the strips approximately 1 inch wide by 8 inches long.


Gently bend the soap strips in half making the bottom curve of the heart.
Curl each of the ends around a finger to form the hearts top.
Place each heart into the soap mold cavity.
Cut 2 pounds of clear melt and pour soap base into chunks and melt in microwave. Again, using 30 second intervals with stirring in between.


Add 1/8 teaspoon (or less) of ruby mica to melted soap base and gently stir in. Try to keep bubbles to a minimum.
Add in your scent and again stir gently. How much scent you add is up to you. I prefer mine to be lightly scented. Generally around 2% scent per pound of base soap is good. For two pounds of soap that would be about 0.6 - 0.7 ounces.
Spray each white heart with rubbing alcohol.
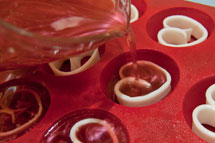
Gently pour the pink soap base into the individual soap molds. Pour until the heart is just sticking out a fraction. I over-poured mine and had to trim them.
Spray the tops of each soap with rubbing alcohol to burst any bubbles. Then allow the soap to sit until it has fully hardened. Pop out of the silicon soap molds and tidy up the edges.
Now that you've made these cute little soaps, you might want to wrap them. Give this soap wrapping tutorial a try and you will have them ready for gift giving in a snap.
Home › How to Make Soap › Melt and Pour Soap Tutorial


Facebook Comments